If you’re looking to integrate your ESP32 with Apple’s HomeKit, you’re in luck. With a bit of setup, you can generate a QR code to streamline the pairing process. Let’s dive into the steps required to generate a QR code for your HomeKit accessory using the esp32-homekit-demo repository.

Cloning the Repository
First, clone the esp32-homekit-demo
git clone --recursive https://github.com/AchimPieters/esp32-homekit-demo.gitThis will download the demo project along with its submodules.
Accessory Setup
Setup Code
The setup code for HomeKit must be an 8-digit number. For instance, 10148005. When generating the accessory SRP verifier, format the setup code as XXX-XX-XXX. So, 10148005 becomes 101-48-005.
Setup ID
Each accessory requires a unique 4-character alphanumeric setup ID. This ID persists across reboots and resets. Ensure it differs from the DeviceID, serial number, model, or accessory name. Here’s an example configuration:
homekit_server_config_t config = {
.accessories = accessories,
.password = "123-45-678",
.setupId = "1QJ8",};

QR Code Prerequisites
To generate the QR code, you need Python and a few libraries. If you’re on macOS, start by installing Homebrew, the missing package manager:
/bin/bash -c "$(curl -fsSL https://raw.githubusercontent.com/Homebrew/install/master/install.sh)"Add Homebrew to your PATH:
export PATH="/usr/local/opt/python/libexec/bin:$PATH"For macOS 10.12 (Sierra) or older, use:
export PATH=/usr/local/bin:/usr/local/sbin:$PATHInstall Python 3:
brew install pythonNext, install the necessary Python libraries:
python3 -m pip install --upgrade pippython3 -m pip install --upgrade Pillowpython3 -mpip install qrcode

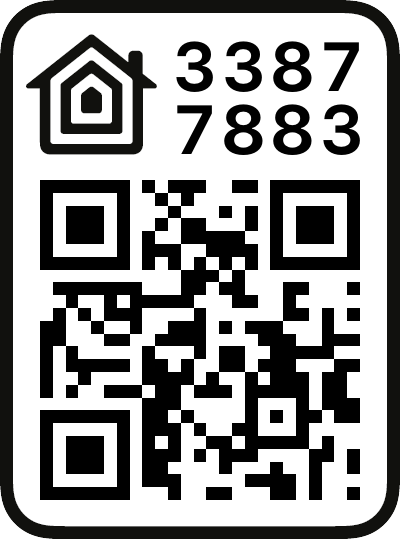
Generate the QR Code
With the prerequisites installed, you can now generate the QR code using the provided script. The command structure is:
tools/gen_qrcode <category> <setup code> <setup ID> <output file>For example:
tools/gen_qrcode 5 123-45-678 1QJ8 qrcode.pngBreakdown
5: HomeKit accessory category (in this case, lighting).123-45-678: The formatted setup code.1QJ8: The setup ID.qrcode.png: The output file where the QR code will be saved.
Press enter, and the QR code will be generated and saved as qrcode.png in the tools folder.

HomeKit Accessory Categories
Here’s a handy table for HomeKit accessory categories:
| Category | Number |
|---|---|
| Other | 1 |
| Bridges | 2 |
| Fans | 3 |
| Garage door openers | 4 |
| Lighting | 5 |
| Locks | 6 |
| Outlets | 7 |
| Switches | 8 |
| Thermostats | 9 |
| Sensors | 10 |
| Security systems | 11 |
| Doors | 12 |
| Windows | 13 |
| Window coverings | 14 |
| Programmable switches | 15 |
| Range extenders | 16 |
| IP cameras | 17 |
| Video doorbells | 18 |
| Air purifiers | 19 |
| Heaters | 20 |
| Air conditioners | 21 |
| Humidifiers | 22 |
| Dehumidifiers | 23 |
| Apple TV | 24 |
| Speakers | 26 |
| Airport | 27 |
| Sprinklers | 28 |
| Faucets | 29 |
| Shower heads | 30 |
| Televisions | 31 |
| Target remotes | 32 |

By following these steps, you’ll have a QR code ready for pairing your ESP32 HomeKit accessory with ease. Happy hacking!